Showing posts with label DIY. Show all posts

Tuesday, August 5, 2014

Wedding DIY Project #6: Wedding Picture Collection

A quick note on one of my other DIY wedding projects, our family wedding picture collection! We are renting a beautiful old historic home for our wedding and the inside of the venue will be decorated with art work by a local artist. Aside form this pictures, the home will not really be decorated to look like a "home". After visiting the venue for a second time I noticed beautiful mantles over the two fire places in the main rooms. I had this vision come to me of family photos lining the tops of them like you would find visiting the home of a loved one. AND, I thought, we could re-use the pictures in our new home to bring the love and blessings and unity of all the wonderful marriages in our families that have come before us. So off we went trying to gather wedding pictures of each of our parents, grand parents, aunt and uncle, plus cousins who are already marries.

Unlike my other projects, this DIY really was a DIT (do it together) and that made all the difference. I loved being able to asked for help and receive enthusiastic support from both sides of our families. I also like to believe that the uncles/aunts/parent/grandparent enjoyed pulling out wedding albums and selecting a picture for this project. Many of them were sent to us via email with things like:

So nice to look back on these! Hope they work for your project!

I love this idea. Can't wait to see you both get married. 

Here is an attached photo. 31 years ago to the day!

Here's the photo- hope it's ok. We were 21 & 22 yrs old- crazy eh?!

It's amazing is that to think we are getting married and will be surrounded by so much history of wonderfully, long and happy marriages!

Friday, August 1, 2014

30 before 30, #20: Finish Catholic Marriage Preparation with Matthew

A quick post about our experience with "marriage prep" leading up to our wedding.

We had a very interesting but fruitful preparation supported by both activities performed by our local church, in our diocese, and on our own. Our local church provided a priest who guided us through a conversation on what we needed to do to complete our paperwork as well as recommendations for a local weekend long conference on marriage prep.Fr. Schad and later Fr. Cortes were both very helpful with discussing marriage, however the "serious stuff" was not discussed here. It was more like: find a time and place to delve deeper.... it's important.

So we gladly signed up a for a four day workshop at a local retreat center. What a great experience! We got to listen to some wonderful speakers followed by serious one-to-one conversation time with your partner. It's funny how Matthew and I both thought we had talked about everything before getting married. Before our retreat, we both were inclined to think, "yeah, I know things about my partner. We talk all the time" and then after an hour of guided discussion our eyes were opened to how much more conversation we still need to have! This has been a wonderful awakening and helped us put an emphasis on talking (and listening!) more often. This weekend also included the compatibility survey, a session with a therapist to discuss the result, and a follow up meeting with the results with our local priest.

Matthew and I were encouraged by my father to read a book that he felt would help us understand issues that are important to men and women. While I do not agree with everything the author outlines (his premise is that there are certain needs that men have and certain needs that women have; I think there are certain needs that each individual has and I don't think these needs fit one gender group or the other), it was ample food for thought! It led to a lot of introspection and closer attention on my part (is this one of Matthew's needs? Do I need to be more gracious in explaining this need instead of assuming Matthew shares this same need?). We also set aside time to discuss the questions at the end of each chapter together, which is always enlightening.

Lastly, we have been intentional in soliciting advice from family members and friends in our community for informal advice. All though the more structured activities were great, this has been my favorite way to cultivate knowledge. There have been many moments were I felt alone in my worries or fears related to our engagement and it is SO comforting to hear wisdom from seasoned veterans. It's also important for us to find good examples of marriage around us to support our goals for our own relationship.

All in all, I am glad that our church required marriage preparation. Even though we both felt confident we were making the right decision, we were open to learning about how to be a better partner and were rewarded for that openness.


Sunday, July 13, 2014

Wedding DIY project #5: Bunting

When I got engaged (heck, before that!) I had so many visions of what I wanted the details of my wedding to look like. Cute flower arrangements (thank I would make!), vintagey table clothes (that I would find!), yummy cakes (that I would also make!), fun little gifts (that I would wrap!), etc. etc. etc.

You can imagine the frustration that started to occur as I began juggling my desire to create with the reality that there are only 24 hours in a day and 8 of those are spent working, 8 for sleeping and the rest disappear with exercise, wedding planning, chores, etc. How would I create the wedding I envisioned if I couldn't find two hours each weekend to dedicate to crafting? I wouldn't. Sob.

Turns out all those details would take hours, days, weeks and months of my time and I simply had other priorities (like going on dates with my handsome groom!). I am so grateful I had a change of heart, even if I went kicking and screaming with the change.

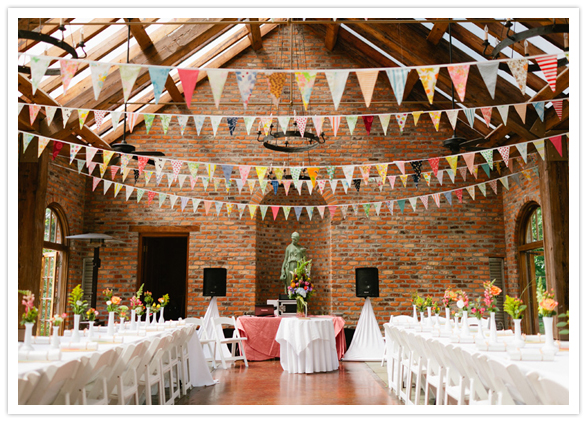
One of the projects that was the impetus for this change was the wedding bunting. Oh lord, y'all, what I wanted was enough beautiful banners to cover my entire 40'x60' ft tent in gorgeous colors and happiness! See below for my inspiration.


I know, right?! Beautiful. What I ended up with was this. 

Inline image 1

 Don't laugh. Yes, I know it's a bad picture.

Part of the reason for using this photo is to demonstrate how different real life can be from the pictures. What I made will never look like styles pictures for a number of reasons out of my control (i.e., $, lightening, venue, qualtiy of camera). So after about 12 hours of craft and only 40' of bunting later, I called it quits and re-envisioned my project. I don't need to line the whole tent with bunting, I can use it as accents on important areas (head table, band, mantles) and get the same effect. Less really is more. Plus, I didn't have any more time to dedicate to this project. 

Looking back, I am happy that I had to learn this lesson the hard way. Setting a goal and adjusting you vision given the circumstances (and still ending up with a stellar product!) is an important lesson in life. I am also glad that I gave up trying to get a project like this to look like what I thought I wanted because it allowed me to focus my efforts on other things (like developing an awesome wedding ceremony!). 

So the verdict: glad I did it, turned out different than I thought, worth the money in the lessons I learned! Bonus: they are super cute and will looks great at our wedding and beyond. :)

Saturday, February 22, 2014

Wedding DIY Project #4: Invitations

After my learning experience with the Save the Dates, any guesses on what we did for invitations?

Yep: ORDERED THEM! Winning! Ok, so not a total DIY but partial DIY.

I hunted for weeks to find the best deal. I mean, I love the cards on so many sites (ahem, Minted and Wedding Paper Divas) but forgive me for not wanting to spend $300+ on invitations. For real, people. I have guests to feed!

I decide to go with a beautiful design (in my colors! yes!) from Invitations by Dawn. Overall, I liked the price range and had a great purchasing experience. I even had a custom request and they called me to confirm exactly what I wanted. I also ordered envelopes from Paper and More.

The best part? My outer envelopes and inner envelopes will not be PRINTED from the computer. Yes, I am a DIY wedding project ninja.

I'd post pictures but I want you to be surprised :) 

Monday, January 6, 2014

Wedding DIY Project #3: Website

Just in case there is anyone out there who would like to know, our wedding website was a real labor of love. That being said, I am SO happy with the outcome especially since it has already been so well received by our guests. 785 hits as of today! :)

After looking through our options, we went with the service offered through The Knot and paid $20 to have our own URL. I think their platform is easy to use and I liked that when I link my registry to our page, the Knot will donate $ for each gift purchased (if guests use the link and then buy a gift).

Check it out here: http://www.stephanieandmatthew.com/

Sunday, January 5, 2014

Wedding DIY Project #2: Save the Dates!

So much crafting has been going on since we got in engaged. I swear wedding planning just brings out the creative juices!

Over the last few weeks, I spent so. much. time. debating what would be the best approach for our save the dates. Literally, hundreds of websites viewed, custom designed created by me, samples ordered, more samples ordered, envelopes, stamps, glue, paint.... I could go on.

I finally decided that we would use a picture of us but a silhouette (more artistic) and I would print them at a local shop. I ordered the card stock and envelopes from http://www.paperandmore.com/. I also made the horrible mistake of thinking I could hand address the envelopes for a more personal look.

Lessons learned:
-Matthew can't write in cursive
-Stephanie can
-80 Save the Dates is about 75 more than you want to address by hand
-ALWAYS, no really, ALWAYS order extra envelopes
-When you ask for a proof and a quote, stick to your guns or your local printer might rip you off
-Cutting curved corners is AWESOME :) and worth it

Overall, I love them and wouldn't change anything. But if I did it again, I'd probably have a professional do them.

A sneak peak :)

Wednesday, July 31, 2013

Wedding DIY Project #1: Bridesmaid Cards

Some of you may know, others may not, but I LOVE CRAFTING. There is something so very exciting about being creative and making a creation that is unique and new. A project that did not and would not exist if your imagination has not willed it into being. And as much as you get a product, you refresh your self with creativity! I like this quote from Maya Angelou that says, "You can't use up creativity. The more you use, the more you have." So true!

Those deep thoughts aside, I have been SO excited about wedding planning in part because it means I have an legitimate excuse to undertake some fun new projects. Today I would like to unveil my first project, Bridesmaid Cards! YAY!

Quick note: For those of you not familiar with DIY, it stands for Do It Yourself, and the abbreviation is used interchangeably for craft or project by some. Below I will reference Pinterest, an online website that acts like an inspirational 'pin' board where you can collect pictures with links to fun projects, the latest fashion trends, recipes, travel ideas and more. 

Pinterest is indeed FULL of fun do it yourself projects, especially for weddings. Along my pinterest journey, I discovered a blog that I fell in love with! Conveniently, the owner recently got married and kept a log of all the projects and fun things she crafted for her wedding. In particular, I loved the way she made cards for her bridesmaids and included pint chips to give the girls direction for picking their own dress (which came out to great, look!!)

With those pictures as my inspiration, I decided on two things: (1) I wanted my bridesmaids to pick their own gowns and (2) I wanted to make my own cards. Below are some pictures of the steps and a look at the final product!

Keep in mind a few things I had to consider while working on this project. Since we have picked our wedding date (01/02/2015) with the church, I learned that the church will be heavily decorated with Christmas decor. I decided that my colors should be neutral but classic and able to blend well with a deep green, red, gold or other colors the church will be using. The alter in the church is white/gray marble and any venue we pick will likely has lots of green as well. I thought ivory, blush and light champagne colors are both classy but flattering for most people while also working for my church and potential venues.

Front of the card and envelope

Inside of the card

The inside of the card has a note for each bridesmaid and more instructions. Given the amount of time we have on our side, I am using this card as a more formal way of asking the ladies to be my bridemaid with more details to come as we figure it out! I printed the addressed on envelopes and bought cute stamps from the post office! 

The cards we bought from Michael's and were stark white, with a front pocket that you can fill with a picture or other insert. I decided this pocket could hold my paint chips/paper cuttings as a guide for the bridesmaids dresses. I used craft scissors to cut the floral guide that I used as an accent point and to show the colors that may be used in the church, bouquets, and reception decorations. The front of the card shows a design that i purchased on Etsy and printed on card stock, glued to green scrap-booking paper and cut with craft scissors. 

Part of the tool pile!

Creating straight edges for my paper inserts

Being organized!

So yay for crafting and yay for finished projects. Only 1,001 more things to make for this wedding! ;) 

Have a happy Wednesday!